Organic crop farming aims to grow plants for food, decoration, medicine or... Read More
- Home >
- Straw Bale Gardening – An Ultimate Guide
Straw Bale Gardening – An Ultimate Guide
Healthy soil is undoubtedly the essence of life.
However, classic, soil-based gardening comes with certain difficulties.
First of all, soil is a major source of plant diseases, especially the fungal and bacterial kind. Young plants are especially susceptible to these diseases, making it challenging to grow them without pesticides. Many beginner gardeners get easily discouraged by the early lack of success in growing healthy plants.
Secondly, the soil is naturally a source of weeds. If you want to have an organic, chemical-free garden, weeding can take a lot of work. Not everyone has not only time but also the needed physical capability to endure a lot of weeding.
Lastly, water retention properties of soils vary greatly, and you may happen to live in an area with poor soil, or the type that is unsuitable for the species you wished to grow.
What if there is a method that can overcome all of these challenges?
Let me introduce you to straw bale gardening.
What is straw bale gardening?

Straw bale gardening is exactly what the name says it is – growing plants in bales of straw serving as a part-raised bed, part-growing medium. Although this may come as a surprise, straw bale gardening can be just as productive as regular, soil-based gardening, although it has some limitations we’ll be discussing a bit later
Straw bale gardening is not the same as straw mulching. While mulching presumes that there is a soil base that is to be mulched, straw bale gardening demands straw bales and very little soil.
Pros & Cons of Straw Bale Gardening
Like any growing method, straw bale gardening has its strengths and weaknesses.
Let’s look at some upsides to the method
Pros
Weed-free
While hay contains seeds from dried-up grasses and other herbaceous plants, straw is a by-product of grain production, which means that all the seeds have been harvested by threshing and only the stalks are left to form the bale. So, unlike with the mentioned hay bales or with the ground soil, there are no pre-existing seeds in the medium.
Even if the weeds do occur, you will be able to pull them out easily, elegantly, and in one piece, lessening the chances of re-emergence.
Self-fertilizing
The straw will decompose as it ages and gets wet from watering. Degradation releases nutrients from the wheat stalks. The only thing you need to watch is nitrogen – you will add it when preparing the bales, and then again during the growing season if your plants requires a lot of nitrogen.
Soil Quality Independence
No good soil – no problem. Like other raised beds, straw beds are ideal for people with no access to quality soil that would support their favorite fruits or vegetables. With the addition of just a little bit of soil-based substrate, straw beds let you create the right circumstances from scratch.
Grow Anywhere
Not only that no-good soil is not a problem for straw bale gardening – no soil whatsoever is not an issue either! Strawbale beds can be positioned on rooftops, concrete pavements, slab, gravel. The only material that you should not put your straw bales on directly are the wooden floors since the moisture from the sponge-like straw bales will lead to rotting.
You can also install straw bale beds on your balcony, although this will require building a special case.
Frost protection
Unlike others, straw is an active substrate. Besides creating nutrients, degradation of straw which takes place with the help of beneficial microbes has another upside to it – it generates heat. That way, if you get frost outside of the season or a long period of unusually cold weather, there is a higher chance your plants will survive when their root zone is being heated.
Moisture retention
Matured straw bales are good at moisture retention. Although they need more watering on average than classically grow gardens, the spongy structure of the matured hay keeps water well and gives you better moisture-retention properties than many common soil types, especially when put in a raised bed setting.
Zero-Waste
At the end of their lifecycle, used straw bales can be simply thrown into your compost pile as brown composting material. The fact that the straw was mixed with soil, had plants growing in it and is already degraded will enrich your compost both in terms of microorganisms
Cons of Straw Bale Gardening
Cost
In some places and/or depending on the season, straw bales can get really expensive. Do your research on what is available in your area and at what price. Wheat straw bales are most commonly discussed, but straw from other grains is just as good (see the next chapter).
Looks
While some people find the look of straw beds a part of the countryside rustic chic, fans of minimalistic, modern design might find it unsightly. On the other hand, you can always mask the straw by growing potatoes or strawberries on the sides of the bales, or by positioning them behind a visual barrier (e.g., a hedge).
Chemical content
Straw from conventionally produced grains can, unfortunately, contain pesticides and other agricultural chemicals. The persistent herbicides can have an adverse impact on the development of your plants and can even kill them. If you want to grow organic, any remaining insecticides or fungicides may curb your effort to have chemical-free produce.
Straw bales from garden stores that are intended for decoration are even worse because along with agricultural chemicals, that can contain fire retardants that are toxic and carcinogenic.
The way to solve this issue is to use straw from organically produced grains, or to use bales that have been aged.
Types of straw

Although we most commonly mention wheat when we talk about straw bales, all other grains can provide you with straw bales ideal for your garden. Besides wheat, this includes barley, oats, and rye.
In some regions, it might be easier to come across bales of alfalfa or vetch, common sillage, and fodder crops. This may be acceptable since both crops are usually cut down before they flower and seed. The structure of these bales is hay-like and not straw-like.
The only types of agricultural bales to avoid are corn and linseed (flax). Corn degrades too slowly for it to be effective for growing plants due to its coarse and relatively hard structure. Linseed is the slowest to degrade since its oil content hampers the desirable decomposition process.
Organic or Not?
Another important classification to consider is straw from conventional or organic production.
Organic production means that the grains have been grown with no pesticides or synthetic fertilizers. Although some chemicals are approved for use in organic gardening, the straw and hay that is organically farmed can be considered chemically “clean”.
However, organic farming takes up only 7.5 percent of agricultural land in the EU, 2.9 percent in the UK, and a mere 0.6 percent in the US. That means that while it is easy to recommend straw bale gardeners to get organic straw (which I do), in reality, it can be really hard to get a hold of.
If your straw bales come from conventional production, which is more likely, it will almost certainly contain residual pesticides.
Herbicides are especially problematic since they directly hurt and may kill your plants. Persistent herbicides include aminopyralid, aminocyclopyrachlor, clopyralid, and picloram. Recently it was discovered that glyphosate is also relatively persistent, staying in the environment for about a year.
Although you can’t avoid some degree of chemical contamination with conventional straw, you can try and make some moves towards minimizing it. Find a reliable farmer who will tell you if he has been using herbicides and of what kind in his fields.
Also, storing bales for some time before using them for planting will ensure that the herbicides and other pesticides have degraded. Buying straw bales from the previous year’s harvest for spring planting will ensure that it is relatively chemical-free unless the persistent pesticides have been used.
Decorative Straw Bales, Yes or No?
Another big no-no are decorative straw bales. Even if you already own these or have a chance to buy them at a discount price – do not repurpose them for gardening (or composting). As I already mentioned, they may contain other chemicals such as fire retardants that can be toxic or carcinogenic. You don’t want that near your food. Even if you want to plant flowers only, the chemicals will leach into the soil when you water the beds.
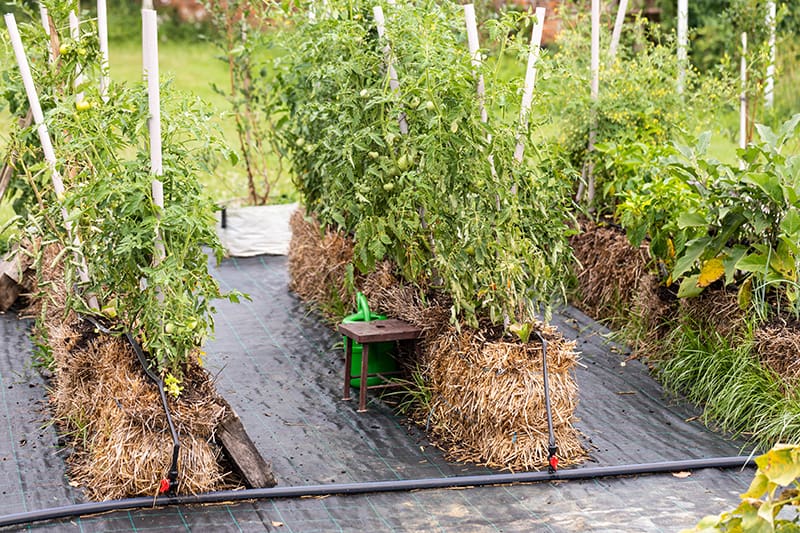
How to start a straw bale garden
When beginning with straw bale gardening, there are several steps you need to do to ensure the right start.
Positioning

The first thing to consider is the positioning of the straw bale beds in your garden. That is the first thing to do because moving the bales around after you’ve prepared them for planting (let alone planted them) is challenging, especially once they become heavy after the first water soak.
Positioning will depend on two things:
Space available in your garden
Types of plants you would like to grow and their sun exposure needs.
The beautiful thing about using straw bales is that you can create various formations which will help you save space and add more charm to your garden.
Some popular options include classic straight rows, L-shaped configurations, U-shaped configurations, and square setups.
One thing to keep in mind is that bales will shrink as they decompose. Some people fill the spaces that open between the bales with more straw and soil.
Sun Exposure
The bales themselves can stand to be exposed to full, as well as being in the shade. So the bales themselves are not a limitation in this respect. Positioning will depend on the types of plants you would like to grow.
According to their need for sunlight, plants can be put in full sunlight, partial sunlight, semi-shade, or full shade. This information is always provided in any plant care sheet – and it is even featured on the commercial seed packs.
You should always group species with similar lighting needs together.
Ground preparation
In straw bale gardening, you don’t just put your bales on the ground, over the soil and existing vegetation. Instead, an insulating layer between the ground and the straw bed is usually added. This is done in order to prevent weeds, insects, and pathogens to infiltrate into your straw bale beds.
The materials you can use for this purpose are:
- Cardboard
- Newspapers
- Fabric or Agricultural Fabric
- Other types of lining (plastic and burlap membranes, etc.)
If you have moles and groundhogs in your garden, adding a wire mesh over this insulating layer will prevent these critters from infiltrating your straw bales and digging out your hard work.
Conditioning

Freshly produced or bought straw bale does not have the right properties for planting. It needs to go through a process usually called conditioning.
During conditioning, you will get bales to start decomposing by adding water, and fix the biggest issue of straw bale medium – the lack of nitrogen.
Conditioning will take 7 to 12 days. When it is done, your straw bale beds will be ready for planting.
How To Condition Straw Bales
There are several ways to do conditioning. Here is the most commonly used approach.
Arrange the bales the way you want them to be in your final design.
Get a high-nitrogen fertilizer – a lawn or leafy green vegetable fertilizer with high nitrogen content will work – and spread it on top of the bales.
Water the fertilizer every day for several days, taking care to saturate with water evenly. A couple of days into the routine, add more fertilizer.
After several days, stick your arm into the middle of one bale. Is it warm? If the answer is “Yes”, that means that the desired decomposition process has started.
When the straw has started to get warm and decompose, get a mix of potting soil of your choosing and compost, and spread 2-3 inches of it over the bales.
Your straw bale growing medium is ready!
What to Plant in A Straw Bale Garden

The great news is that the list of plants that you can grow in straw bale beds is very long – it includes most of the commonly grown vegetables, with a few exceptions
Another unique possibility of straw bale gardening is that you can use more than one, horizontal plane for planting. Some plants, most notably potatoes and strawberries, are able to grow from the sides of straw bales. That allows you to maximize yields from a limited growing space.
Plants not suitable for straw bale gardening
It is much easier just to single out the crops that would not feel at home in straw bales:
Corn – too tall and lanky and easy to topple over (or topple over the entire bed!) it will not be able to grow and stay stable in a straw bale bed unless it is a dwarf variety.
Spreading plants – plants such as Jerusalem artichoke who have a tendency to spread rapidly via underground growth may be difficult to manage in a straw bale setting.
Plants great for straw bale gardening
Let’s have a quick look at the plants that are 100% easy to grow in a straw bale garden and also beginner-friendly.
Root vegetables
Root vegetables are one of the straw bale gardening favorites. Growing them in this medium has a lot of advantages
Carrots
Besides the fact they grow well in this medium, there’s one more silver lining – carrots are so easy to pull out of straw bale beds that it’s almost effortless. And they come out nearly clean. If you want to let your kids tend their crops and have the joy of harvesting it all by themselves, by all means, consider straw bale-plus-carrots combo.
Potatoes
Potatoes are one of the stars of straw bale gardening, and the very reason many people heard about straw bale gardening in the first place. Like with carrots, one of the great advantages of harvesting potatoes from straw is the fact that you can get them out easily and neatly – no need for special extraction tools and loads of water to wash off heavy clay soil.
Another advantage is that you can plant your seed potatoes deep (e.g., 14-18 inches) without any hassle. Potato plants produce tubers from their stems, so the longer the stem – more potatoes it can grow.
Note: as they grow, root veggies may weaken the bales over time. That is why all root crops will benefit from reinforcing bales with the help of containers, fencing or other types of sturdy cover.
Leafy greens

Leafy greens are very easy to grow in a straw bale setting. They are the best option if you are looking to get some instant gratification. As you will be growing your crops for leaves rather than fruits, harvest that comes quickly after planting.
Leafy greens will benefit from the spongy, well-aerated substrate, and your ability to control water saturation in the beds. Plant them early in the spring, and then again in the fall. They can be harvested every two (lettuce) to four weeks.
Leafy greens you can grow in straw bales include:
- Lettuce (all kinds)
- Chard
- Kale
- Spinach
- Arugula
- Chicory
For lettuce and other leafy greens, it is recommended to fertilize with nitrogen additionally a week or two into the growing cycle.
Herbs
Herbs are as equally easy and quick to grow as leafy greens. Also, both groups of plants require a lot of nitrogen. The only difference is that while most leafy greens enjoy some shade, herbs thrive in full sunlight.
In your straw bale beds you can grow:
- Basil
- Parsley
- Mint
- Cilantro
Avoid planting herbs and leafy greens together, since their nitrogen needs overlap, while their sun exposure needs differ.
Mediterranean-type of herbs like thyme or rosemary are not a good choice for straw bale planting since they like a drier environment. Also, they are perennial, so you will have to replant them every year, or every time your bales have come to an end of their cycle.
Tomatoes
Although technically fruits, tomatoes are officially the most popular vegetables in the world. No wonder that they are one of the most commonly grown vegetables in home gardens. They can be readily grown in straw bale gardens too.
The only issue with tomatoes and straw bales might be their stability. Unless you are growing a creepy variety, the brittle tomato vine will need support as it grows.
The best option is to try with cherry tomatoes during your first year, so you can practice stabilizing with plants that have lighter fruit than standard or extra-large varieties.
Other vegetables
Any other types of vegetables can be grown in straw bales. These include broccoli, cauliflower, eggplant, squash, and peppers. Vegetables with vines and heavier fruits will require support or staking. Beans and peas can be grown too if you provide them with something to cling to.
Companion planting
Planting certain types of flowers along your veggies can not only be a pretty sight but also highly beneficial to help fight pests.
Plant marigolds to deter whiteflies and attract ladybugs, which will feed on aphids. Planting nasturtiums attracts the existing aphids from your garden, which means they will likely leave the companion vegetable alone.
Planting tomato and basil together will repel certain insects (and mosquitoes!), plus it produces tastier tomato fruit. The same goes for broccoli.
Check out more companion planting ideas here.
Maintaining a straw bale garden
Straw bale gardens are easy to maintain. However, there are a few specifics you should keep in mind.
Watering
As other raised bed structures, straw bale beds consume more water than your average soil garden. Since the structure is exposed to air from several sides and is pretty airy, evaporation is greater than from the compact soil.
That means that you will have to water your garden frequently – even every day during hot summer months. This may be an issue in drier climates where water resources get scarce during summer.
The good side of the increased water evaporation is that it is very unlikely that your growing medium will get waterlogged and lead to plant rot. The downside is obvious if you live in a dry area with a limited water supply. However, some gardeners are able to solve the evaporation issue by wrapping their bales in a plastic lining.
Collecting rainwater is beneficial for any type of gardening, and I especially recommend it for water-hungry kinds like straw bale gardening.
Planting in Straw Bales

In terms of planting, straw bales are no different than regular soil. You can plant seeds directly, or re-plant young plants from pots. The latter option is easier for beginners as it provides quicker results and you get to skip the seedling phase when the. However, growing your veggies all the way from seeds is certainly a more fulfilling experience, and the plant’s roots will be better established in the straw. This may be important for top-heavy plants like tomatoes, eggplants, and peppers.
Planting From Pots
To plant out young plants from pots, stick a trowel or other suitable tool into the bale and (by making twisting or spreading movements) create a hole big enough to accommodate the entire root ball of the plant. Roots will need enough soil to get the plant established before the roots can spread into the ball. That is why you should add more compost and substrate along with the one coming from the rootball.
Planting from Seeds
If you want to plant from seeds, make a small opening in the straw and add seedling substrate mix or fine potting soil. You will plant the seeds in there, several in one planting space, like you would in a pot. It will not be long before the seed sprouts and the seedling spreads its roots beyond this zone and into the bale. Once they grow a second pair of permanent leaves, remove any that look weak and replant the excess ones.
This method saves both the potting/seedling mix and seeds. If you have generous amounts of both, you can simply spread a layer of the seeding or fine potting mix on the top of the bales and plant your seedlings in there.
For both methods, do not use soil from your garden, as this might add weeds or pests.
Pests
Although straw bale beds are usually spared from many common soil-based and soil-borne diseases and pests, it is not completely pest-proof. Your juicy plants will still attract above-ground creatures such as rabbits, deer, and groundhogs that would like to have a nibble. Insects such as potato beetle will not be deterred by straw in a any way.
Insects can be dealt with in several ways. I always recommend to first try organic solutions, and this especially goes for straw bale gardening. Mechanical control of insects (removing them by hand), along with biological remedies can be sufficient for small-scale operations such as raised beds.
For larger herbivores, inexpensive wire fences can be found in garden centers which can be a suitable deterrent for rabbits. Pick the ones that are compatible in shape and size with straw bales. However, this simplest solution is not 100% certain. Anyone with more valuable production should consider using more complex wire mesh fencing.
Bale Degradation and Replacement
Over time, the straw bales will start losing their form and their structure and will need replacement. This will usually happen after 3-4 planting cycles. On average, you can pull through the entire growing season with one set of straw bales.
At the end of their lifetime, straw bales make a perfect brown compost material.
Conclusion
While straw bale gardening might look a bit alien and unusual at first glance, it is a convenient and stress-free way to grow plants. Saving time on fighting weeds, diseases, and certain pests can let you spend more time simply enjoying watching your plants grow. Straw bale gardening is extremely suitable for small-scale organic growers – as long as you can source good straw bales.
Related Content
-
Organic Hydroponics Guide & How to Use Organic Nutrients in Hydroponics
-
Best Hydroponic Nutrients 2019: Reviews and Buying Guide
Your plants love nutrients as much as you need food to survive and grow. B... Read More
-
Guide to Hydrogen Peroxide (H2O2) in Hydroponics
If you want to boost the productivity of your crops, chemistry is your bes... Read More
-
Epsom Salt for Plants – Tips For Using Epsom Salt In The Garden
If you grow roses or tomatoes, it’s likely that you’ve heard of people tre... Read More
Explore Our Categories
-
 Edible Plants
Edible gardening includes fruit, vegetables, herbs, and edible flowers. There are thousands of varieties within each of ...
-
Berry Bushes
Whether you are growing a common berry, such as blueberries or raspberries, or something more exotic, like a magnolia vi...
-
Ferns
Ferns are one of the most popular types of plants used for shaded areas, as they thrive in low light conditions, bringin...